Posted: May 12th, 2015 | Author: Alex Korn | Filed under: Tutorials | Tags: JSON, multi-byte safe, mysql, PHP, string escaping, unicode | No Comments »
The problem
Recently, I came across what started as a straightforward problem: In MySQL I was JOINing from Table A to Table B on a’s primary key, and wanted to display a list of all items in Table A, each followed by a list of all associated items in Table B.
My initial thought was to hand-roll my own JSON, so that the result of the query would have a few columns with the results of Table A, then a column with the JSON-encoded data from Table B. I realize that one should never hand-roll their own JSON, but there isn’t a native JSON encoder in MySQL, so I had to make do.
It was easy enough to come up with a basic JSON format using the following. I’ve done some pretty aggressive tabbing and newlines here to try to make the layers of functions as straightforward as possible; different arguments to each function align vertically.
SELECT a.aId, a.name,
    CONCAT(
        '[',
        GROUP_CONCAT(
            CONCAT(
                '[',
                b.bId, ', ',
                '\"', b.name, '\"',
                ']')
            ORDER BY b.bId ASC
            SEPARATOR ','),
        ']'
    ) AS bData
FROM a
    JOIN b
        ON a.bId = b.bId
GROUP BY a.aId |
SELECT a.aId, a.name,
CONCAT(
'[',
GROUP_CONCAT(
CONCAT(
'[',
b.bId, ', ',
'\"', b.name, '\"',
']')
ORDER BY b.bId ASC
SEPARATOR ','),
']'
) AS bData
FROM a
JOIN b
ON a.bId = b.bId
GROUP BY a.aId
(Note that I am not the first person to come up with this solution.)
However, if b.name has a quotation mark (or a variety of other characters), this creates invalid JSON. How do we ensure that we always create valid JSON, even when there are special characters or unicode/multi-byte characters?
The solution
Ensuring we always have valid JSON was surprisingly easy – we can hexadecimal-encode b.name in the MySQL query, which ensures that its character set is 0-9 or A-F, so it will always be properly contained within the quotation marks around it. We then convert it back into a normal string in the application code.
SELECT a.aId, a.name,
    CONCAT(
        '[',
        COALESCE(
            GROUP_CONCAT(
                CONCAT(
                    '[',
                    b.bId, ', ',
                    '\"', HEX(b.name), '\"',
                    ']')
                ORDER BY b.bId ASC
                SEPARATOR ','),
            ''),
        ']') AS bData
FROM a
    JOIN b
        ON a.bId = b.bId
GROUP BY a.aId |
SELECT a.aId, a.name,
CONCAT(
'[',
COALESCE(
GROUP_CONCAT(
CONCAT(
'[',
b.bId, ', ',
'\"', HEX(b.name), '\"',
']')
ORDER BY b.bId ASC
SEPARATOR ','),
''),
']') AS bData
FROM a
JOIN b
ON a.bId = b.bId
GROUP BY a.aId
So let’s say b.name was something like '☃' (because I know people are always naming their things [unicode Snowman]), the resulting hexadecimal representation is 27E2988327. Opaque, but definitely JSON-safe!
Note that we also use COALESCE in case there are no associated items in Table B; otherwise CONCAT('[', NULL, ']' gives us NULL, not [].
All we have left to do is convert the hexadecimal representation back into text in the application. Here’s a function in PHP that does the trick:
function hexToStr($hex)
{
    $string = '';
    for ($charIter = 0; $charIter < strlen($hex) - 1; $charIter += 2)
    {
        $string .= chr(hexdec($hex[$charIter] . $hex[$charIter + 1]));
    }
    return $string;
} |
function hexToStr($hex)
{
$string = '';
for ($charIter = 0; $charIter < strlen($hex) - 1; $charIter += 2)
{
$string .= chr(hexdec($hex[$charIter] . $hex[$charIter + 1]));
}
return $string;
}
Happy coding, and remember to be safe and always properly escape your strings!
Feel free to ask questions or give feedback via Twitter.
Posted: May 20th, 2013 | Author: Alex Korn | Filed under: Tutorials | Tags: algorithms, depth-first search, graph theory, PHP | No Comments »
(Disclaimer: I have no affiliation with Ruzzle.)
Introduction
I was recently introduced to the game Ruzzle, a word finding game with some Scrabble-like scoring components. If you’re not familiar with it, check out their website and watch the quick introductory video.
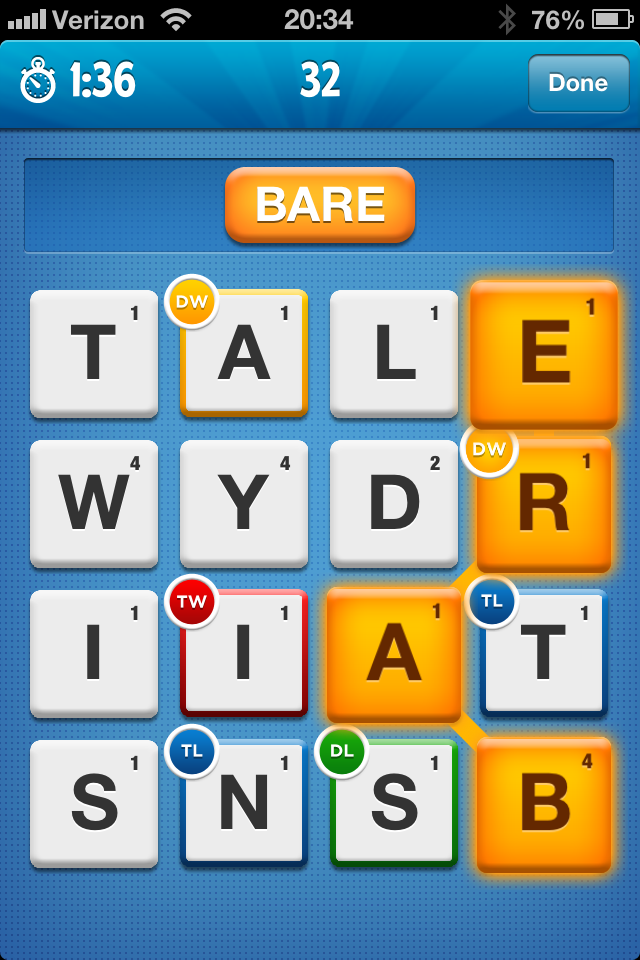
Ruzzle screenshot
I was fascinated by how the game calculated all the possible words on each board. So I decided to program it. Check out the Ruzzle demo page, which creates a randomized board and finds all possible words.
Overview
The way to do this search for all possible words is by viewing the letters as a directed graph where the letters are nodes and edges are connections between adjacent letters.
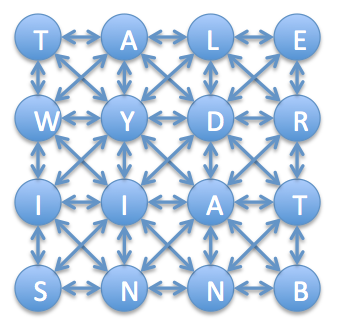
Ruzzle graph. This was more of a pain to make than you might expect.
With this graph, we can do a Depth-first search (DFS) for words starting at each node.
Creating the board
First, we need to create a 4×4 board of letters. In order to create reasonable boards for English, we weight the letter distribution to that of their distribution in English.
The following code creates the graph/board, assigns letters to each node/tile, and outputs the board. The basic graph objects are shown at the end of this post.
/**
 * Create graph/board
 */

$timeStart = microtime(true);

$colCount = 4;
$rowCount = 4;

$lettersGraph = new Graph_Directed();
/**
 * @var array Map<colId, Map<rowId, char letter>>
 */
$lettersGraphNode = [];
for ($colIter = 0; $colIter < $colCount; ++$colIter)
{
    for ($rowIter = 0; $rowIter < $rowCount; ++$rowIter)
    {
        $node = $lettersGraphNode[$colIter][$rowIter] = new Graph_Node($lettersGraph);
    }
}

/**
 * Attach each node to all adjacent nodes
 */
for ($colIter = 0; $colIter < $colCount; ++$colIter)
{
    for ($rowIter = 0; $rowIter < $rowCount; ++$rowIter)
    {
        $node = $lettersGraphNode[$colIter][$rowIter];
        for ($adjacentColIter = max(0, $colIter - 1);
            $adjacentColIter < min($colCount, $colIter + 1 + 1);
            ++$adjacentColIter)
        {
            for ($adjacentRowIter = max(0, $rowIter - 1);
                $adjacentRowIter < min($rowCount, $rowIter + 1 + 1);
                ++$adjacentRowIter)
            {
                // don't connect letters to themselves
                if ($colIter == $adjacentColIter &&
                        $rowIter == $adjacentRowIter)
                {
                    continue;
                }
                $node->connectFlowFrom(
                        $lettersGraphNode[$adjacentColIter][$adjacentRowIter]);
            }
        }
    }
}

/**
 * @see http://en.wikipedia.org/wiki/Letter_frequency#Relative_frequencies_of_letters_in_the_English_language
 */
$letterFrequency = [
    'A' => 0.08167,
    'B' => 0.01492,
    'C' => 0.02782,
    'D' => 0.04253,
    'E' => 0.12702,
    'F' => 0.02228,
    'G' => 0.02015,
    'H' => 0.06094,
    'I' => 0.06966,
    'J' => 0.00153,
    'K' => 0.00772,
    'L' => 0.04025,
    'M' => 0.02406,
    'N' => 0.06749,
    'O' => 0.07507,
    'P' => 0.01929,
    'Q' => 0.00095,
    'R' => 0.05987,
    'S' => 0.06327,
    'T' => 0.09056,
    'U' => 0.02758,
    'V' => 0.00978,
    'W' => 0.02360,
    'X' => 0.00150,
    'Y' => 0.01974,
    'Z' => 0.00074 + 0.00001, // there's some rounding in Wikipedia's list
];
$letterToMaxCumulativeFrequency = [];
$cumulativeFrequency = 0;
foreach ($letterFrequency as $letter => $frequency)
{
    $cumulativeFrequency += $frequency;
    $letterToMaxCumulativeFrequency[$letter] = $cumulativeFrequency;
}

foreach ($lettersGraph->getNodes() as $node)
{
    $val = mt_rand(0, mt_getrandmax()) / mt_getrandmax();
    foreach ($letterToMaxCumulativeFrequency as $letter => $maxFrequency)
    {
        if ($val < $maxFrequency)
        {
            $node->letter = $letter;
            break;
        }
    }
}

/**
 * @param array $lettersGraphNode
 * @return string/HC
 */
function printTileLetters(array $lettersGraphNode)
{
    $result = '<table><tbody>';
    foreach ($lettersGraphNode as $colData)
    {
        $result .= '<tr>';
        foreach ($colData as $rowData)
        {
            $result .= '<td>' . $rowData->letter . '</td>';
        }
        $result .= '</tr>';
    }
    $result .= '</tbody></table>';
    return $result;
}

echo printTileLetters($lettersGraphNode); |
/**
* Create graph/board
*/
$timeStart = microtime(true);
$colCount = 4;
$rowCount = 4;
$lettersGraph = new Graph_Directed();
/**
* @var array Map<colId, Map<rowId, char letter>>
*/
$lettersGraphNode = [];
for ($colIter = 0; $colIter < $colCount; ++$colIter)
{
for ($rowIter = 0; $rowIter < $rowCount; ++$rowIter)
{
$node = $lettersGraphNode[$colIter][$rowIter] = new Graph_Node($lettersGraph);
}
}
/**
* Attach each node to all adjacent nodes
*/
for ($colIter = 0; $colIter < $colCount; ++$colIter)
{
for ($rowIter = 0; $rowIter < $rowCount; ++$rowIter)
{
$node = $lettersGraphNode[$colIter][$rowIter];
for ($adjacentColIter = max(0, $colIter - 1);
$adjacentColIter < min($colCount, $colIter + 1 + 1);
++$adjacentColIter)
{
for ($adjacentRowIter = max(0, $rowIter - 1);
$adjacentRowIter < min($rowCount, $rowIter + 1 + 1);
++$adjacentRowIter)
{
// don't connect letters to themselves
if ($colIter == $adjacentColIter &&
$rowIter == $adjacentRowIter)
{
continue;
}
$node->connectFlowFrom(
$lettersGraphNode[$adjacentColIter][$adjacentRowIter]);
}
}
}
}
/**
* @see http://en.wikipedia.org/wiki/Letter_frequency#Relative_frequencies_of_letters_in_the_English_language
*/
$letterFrequency = [
'A' => 0.08167,
'B' => 0.01492,
'C' => 0.02782,
'D' => 0.04253,
'E' => 0.12702,
'F' => 0.02228,
'G' => 0.02015,
'H' => 0.06094,
'I' => 0.06966,
'J' => 0.00153,
'K' => 0.00772,
'L' => 0.04025,
'M' => 0.02406,
'N' => 0.06749,
'O' => 0.07507,
'P' => 0.01929,
'Q' => 0.00095,
'R' => 0.05987,
'S' => 0.06327,
'T' => 0.09056,
'U' => 0.02758,
'V' => 0.00978,
'W' => 0.02360,
'X' => 0.00150,
'Y' => 0.01974,
'Z' => 0.00074 + 0.00001, // there's some rounding in Wikipedia's list
];
$letterToMaxCumulativeFrequency = [];
$cumulativeFrequency = 0;
foreach ($letterFrequency as $letter => $frequency)
{
$cumulativeFrequency += $frequency;
$letterToMaxCumulativeFrequency[$letter] = $cumulativeFrequency;
}
foreach ($lettersGraph->getNodes() as $node)
{
$val = mt_rand(0, mt_getrandmax()) / mt_getrandmax();
foreach ($letterToMaxCumulativeFrequency as $letter => $maxFrequency)
{
if ($val < $maxFrequency)
{
$node->letter = $letter;
break;
}
}
}
/**
* @param array $lettersGraphNode
* @return string/HC
*/
function printTileLetters(array $lettersGraphNode)
{
$result = '<table><tbody>';
foreach ($lettersGraphNode as $colData)
{
$result .= '<tr>';
foreach ($colData as $rowData)
{
$result .= '<td>' . $rowData->letter . '</td>';
}
$result .= '</tr>';
}
$result .= '</tbody></table>';
return $result;
}
echo printTileLetters($lettersGraphNode);
Graph search, algorithmic complexity, and optimization
First, we need to load and parse the dictionary. I’ve found this dictionary works well.
/**
 * Load/parse dictionary
 */

$dictionaryList = file(dirname(dirname(__FILE__)) . '/data/dictionary.txt');
$dictionaryMap = [];
foreach ($dictionaryList as $word)
{
    $dictionaryMap[strtoupper(trim($word))] = true;
}

/**
 * Set up first letters array, which helps us optimize the otherwise-slow
 * DFS for words.
 */

$dictionaryFirstNLetters = [];
define('MIN_FIRST_LETTERS_LENGTH', 4);
define('MAX_FIRST_LETTERS_LENGTH', 10);

foreach ($dictionaryList as $word)
{
    $word = strtoupper(trim($word));
    for ($length = MIN_FIRST_LETTERS_LENGTH; $length < MAX_FIRST_LETTERS_LENGTH; ++$length)
    {
        $firstNLetters = substr($word, 0, $length);
        if ($firstNLetters != $word)
        {
            $dictionaryFirstNLetters[$firstNLetters] = true;
        }
        else
        {
            break;
        }
    }
}

echo "Dictionary loaded/parsed in " . number_format(microtime(true) - $timeStart, 3) . "s<br><br>\n"; |
/**
* Load/parse dictionary
*/
$dictionaryList = file(dirname(dirname(__FILE__)) . '/data/dictionary.txt');
$dictionaryMap = [];
foreach ($dictionaryList as $word)
{
$dictionaryMap[strtoupper(trim($word))] = true;
}
/**
* Set up first letters array, which helps us optimize the otherwise-slow
* DFS for words.
*/
$dictionaryFirstNLetters = [];
define('MIN_FIRST_LETTERS_LENGTH', 4);
define('MAX_FIRST_LETTERS_LENGTH', 10);
foreach ($dictionaryList as $word)
{
$word = strtoupper(trim($word));
for ($length = MIN_FIRST_LETTERS_LENGTH; $length < MAX_FIRST_LETTERS_LENGTH; ++$length)
{
$firstNLetters = substr($word, 0, $length);
if ($firstNLetters != $word)
{
$dictionaryFirstNLetters[$firstNLetters] = true;
}
else
{
break;
}
}
}
echo "Dictionary loaded/parsed in " . number_format(microtime(true) - $timeStart, 3) . "s<br><br>\n";
Note the variable $dictionaryFirstNLetters. We use this to optimize our DFS by allowing us to “bail out” early in our search if we see that there are no words that start with our $currentResult. If you try taking out this code, you’ll see that this algorithm can take an incredibly long time to run – even with a $maxDepth of 6 characters (only find words with up to 6 characters), the runtime can easily reach a minute. It increases quickly as $maxDepth is increased.
Below is our optimized depth-first search.
/**
 * @param Zeal_Graph_Node $source
 * @param int $maxDepth
 * @param array $dictionaryMap
 * @param array $dictionaryFirstNLetters
 * @param array $previouslyVisitedNodeIds
 * @param string $currentResult
 * @param array $results (By reference)
 * @return array
 */
function depthFirstSearch(Zeal_Graph_Node $source, $maxDepth,
        array $dictionaryMap, array $dictionaryFirstNLetters,
        $previouslyVisitedNodeIds = [], $currentResult = '', array &$results = [])
{
    if (strlen($currentResult) >= $maxDepth)
    {
        return [];
    }
    $currentResult .= $source->letter;
    if (isset($dictionaryMap[$currentResult]))
    {
        $results[] = $currentResult;
    }
    // bail out if there are no words that start with these letters
    if (strlen($currentResult) >= MIN_FIRST_LETTERS_LENGTH &&
        strlen($currentResult) <= MAX_FIRST_LETTERS_LENGTH &&
            !isset($dictionaryFirstNLetters[$currentResult]))
    {
        return [];
    }
    $previouslyVisitedNodeIds[] = $source->id();
    foreach ($source->outgoingEdges as $edge)
    {
        $destination = $edge->getNodeTo();
        // can't repeat letters
        if (in_array($destination->id(), $previouslyVisitedNodeIds))
        {
            continue;
        }
        $results += depthFirstSearch($destination, $maxDepth,
                $dictionaryMap, $dictionaryFirstNLetters, $previouslyVisitedNodeIds, $currentResult, $results);
    }
    return $results;
}

/**
 * Iterate over each tile and find all words starting with that letter
 */
$results = [];
for ($colIter = 0; $colIter < $colCount; ++$colIter)
{
    for ($rowIter = 0; $rowIter < $rowCount; ++$rowIter)
    {
        $results = array_merge(
            $results,
            depthFirstSearch(
                $lettersGraphNode[$colIter][$rowIter], $colCount * $rowCount,
                $dictionaryMap, $dictionaryFirstNLetters)
        );
    }
}

echo "<br>Stats\n<ul><li>Before uniquing: " . number_format(count($results)) . "</li>\n";
$resultsUnique = array_unique($results);
echo "<li>After uniquing: " . number_format(count($resultsUnique)) . "</li></ul>\n";
echo 'Words found<ul><li>' . implode("</li><li>\n", $resultsUnique) . '</li></ul>';

echo "\n" . number_format(microtime(true) - $timeStart, 2) . "s\n"; |
/**
* @param Zeal_Graph_Node $source
* @param int $maxDepth
* @param array $dictionaryMap
* @param array $dictionaryFirstNLetters
* @param array $previouslyVisitedNodeIds
* @param string $currentResult
* @param array $results (By reference)
* @return array
*/
function depthFirstSearch(Zeal_Graph_Node $source, $maxDepth,
array $dictionaryMap, array $dictionaryFirstNLetters,
$previouslyVisitedNodeIds = [], $currentResult = '', array &$results = [])
{
if (strlen($currentResult) >= $maxDepth)
{
return [];
}
$currentResult .= $source->letter;
if (isset($dictionaryMap[$currentResult]))
{
$results[] = $currentResult;
}
// bail out if there are no words that start with these letters
if (strlen($currentResult) >= MIN_FIRST_LETTERS_LENGTH &&
strlen($currentResult) <= MAX_FIRST_LETTERS_LENGTH &&
!isset($dictionaryFirstNLetters[$currentResult]))
{
return [];
}
$previouslyVisitedNodeIds[] = $source->id();
foreach ($source->outgoingEdges as $edge)
{
$destination = $edge->getNodeTo();
// can't repeat letters
if (in_array($destination->id(), $previouslyVisitedNodeIds))
{
continue;
}
$results += depthFirstSearch($destination, $maxDepth,
$dictionaryMap, $dictionaryFirstNLetters, $previouslyVisitedNodeIds, $currentResult, $results);
}
return $results;
}
/**
* Iterate over each tile and find all words starting with that letter
*/
$results = [];
for ($colIter = 0; $colIter < $colCount; ++$colIter)
{
for ($rowIter = 0; $rowIter < $rowCount; ++$rowIter)
{
$results = array_merge(
$results,
depthFirstSearch(
$lettersGraphNode[$colIter][$rowIter], $colCount * $rowCount,
$dictionaryMap, $dictionaryFirstNLetters)
);
}
}
echo "<br>Stats\n<ul><li>Before uniquing: " . number_format(count($results)) . "</li>\n";
$resultsUnique = array_unique($results);
echo "<li>After uniquing: " . number_format(count($resultsUnique)) . "</li></ul>\n";
echo 'Words found<ul><li>' . implode("</li><li>\n", $resultsUnique) . '</li></ul>';
echo "\n" . number_format(microtime(true) - $timeStart, 2) . "s\n";
What’s next
This crash-course in Ruzzle programming doesn’t address the scoring, graphics, or actual gameplay. But these would all be fairly easy to add to the basic chasis that we’ve created here. I’ll leave that as an exercise to the reader 🙂
Reference
The graph code I use is straightforward, and given below.
Directed graph
/**
 * A directed graph.
 * - http://en.wikipedia.org/wiki/Directed_graph
 */
class Graph_Directed
{
    /**************************************************************************
     * @section ID generators
     */

    /**
     * @var int
     */
    protected $_maxNodeId = 0;
    /**
     * @param Graph_Node $node
     * @return int
     */
    public final function getNextNodeId(Graph_Node $node)
    {
        ++$this->_maxNodeId;
        $this->_nodes[$this->_maxNodeId] = $node;
        return $this->_maxNodeId;
    }

    /**
     * @var int
     */
    protected $_maxEdgeId = 0;
    /**
     * @param Graph_Edge $edge
     * @return int
     */
    public final function getNextEdgeId(Graph_Edge $edge)
    {
        ++$this->_maxEdgeId;
        if (!($edge instanceof ipGraph_EdgeResidual))
        {
            $this->_edges[$this->_maxEdgeId] = $edge;
        }
        return $this->_maxEdgeId;
    }

    /**************************************************************************
     * @section Edges, Nodes getters
     */

    /**
     * @var array Map<int id, Zeal_Graph_Node> $_nodes
     */
    protected $_nodes = [];
    /**
     * Returns nodes
     * @param none
     * @return Map<int id, Zeal_Graph_Node>
     */
    public final function getNodes()
    {
        return $this->_nodes;
    }
    /**
     * @param none
     * @return int
     */
    public final function getNodeCount()
    {
        return count($this->_nodes);
    }

    /**
     * @var array Map<int id, Graph_Edge $_edges
     */
    protected $_edges = [];
    /**
     * @param none
     * @return array Map<edgeId, Graph_Edge>
     */
    public final function getEdges()
    {
        return $this->_edges;
    }
    /**
     * @param none
     * @return int
     */
    public final function getEdgeCount()
    {
        return count($this->_edges);
    }

} |
/**
* A directed graph.
* - http://en.wikipedia.org/wiki/Directed_graph
*/
class Graph_Directed
{
/**************************************************************************
* @section ID generators
*/
/**
* @var int
*/
protected $_maxNodeId = 0;
/**
* @param Graph_Node $node
* @return int
*/
public final function getNextNodeId(Graph_Node $node)
{
++$this->_maxNodeId;
$this->_nodes[$this->_maxNodeId] = $node;
return $this->_maxNodeId;
}
/**
* @var int
*/
protected $_maxEdgeId = 0;
/**
* @param Graph_Edge $edge
* @return int
*/
public final function getNextEdgeId(Graph_Edge $edge)
{
++$this->_maxEdgeId;
if (!($edge instanceof ipGraph_EdgeResidual))
{
$this->_edges[$this->_maxEdgeId] = $edge;
}
return $this->_maxEdgeId;
}
/**************************************************************************
* @section Edges, Nodes getters
*/
/**
* @var array Map<int id, Zeal_Graph_Node> $_nodes
*/
protected $_nodes = [];
/**
* Returns nodes
* @param none
* @return Map<int id, Zeal_Graph_Node>
*/
public final function getNodes()
{
return $this->_nodes;
}
/**
* @param none
* @return int
*/
public final function getNodeCount()
{
return count($this->_nodes);
}
/**
* @var array Map<int id, Graph_Edge $_edges
*/
protected $_edges = [];
/**
* @param none
* @return array Map<edgeId, Graph_Edge>
*/
public final function getEdges()
{
return $this->_edges;
}
/**
* @param none
* @return int
*/
public final function getEdgeCount()
{
return count($this->_edges);
}
}
Node
/**
 * A node/vertex in a graph.
 * http://en.wikipedia.org/wiki/Graph_(mathematics)
 */
class Graph_Node
{
    /**
     * @var Graph_Directed The graph to which this node belongs
     */
    protected $_graph;

    /**
     * @param Graph_Directed $graph
     */
    public function __construct(Graph_Directed $graph)
    {
        $this->_id = $graph->getNextNodeId($this);
        $this->_graph = $graph;
    }

    /**
     * @var int Unique across the parent Graph_Directed
     */
    protected $_id;
    /**
     * @param none
     * @return int
     */
    public function id()
    {
        return $this->_id;
    }

    /**
     * @param Graph_Node $node
     * @return Graph_Edge
     */
    public function connectFlowFrom(Graph_Node $node)
    {
        $edge = new Graph_Edge($this->_graph, $node, $this);
        return $edge;
    }

} |
/**
* A node/vertex in a graph.
* http://en.wikipedia.org/wiki/Graph_(mathematics)
*/
class Graph_Node
{
/**
* @var Graph_Directed The graph to which this node belongs
*/
protected $_graph;
/**
* @param Graph_Directed $graph
*/
public function __construct(Graph_Directed $graph)
{
$this->_id = $graph->getNextNodeId($this);
$this->_graph = $graph;
}
/**
* @var int Unique across the parent Graph_Directed
*/
protected $_id;
/**
* @param none
* @return int
*/
public function id()
{
return $this->_id;
}
/**
* @param Graph_Node $node
* @return Graph_Edge
*/
public function connectFlowFrom(Graph_Node $node)
{
$edge = new Graph_Edge($this->_graph, $node, $this);
return $edge;
}
}
Edge
/**
 * A directed edge in a directed graph.
 */
class Graph_Edge
{
    /**
     * @var int Unique across the graph
     */
    protected $_id;

    /**
     * @var Graph_Node $_nodeFrom
     */
    protected $_nodeFrom;
    /**
     * @var Graph_Node $_nodeTo
     */
    protected $_nodeTo;

    /**
     * @var Graph_Directed
     */
    protected $_graph;

    /**
     * @param Graph_Directed $graph
     * @param Graph_Node $nodeFrom
     * @param Graph_Node $nodeTo
     */
    public function __construct(Graph_Directed $graph,
            Graph_Node $nodeFrom, Graph_Node $nodeTo)
    {
        $this->_id = $graph->getNextEdgeId($this);
        $this->_graph = $graph;
        $this->_nodeFrom = $nodeFrom;
        $nodeFrom->outgoingEdges[] = $this;
        $this->_nodeTo = $nodeTo;
    }

    /**
     * @param none
     * @return int
     */
    public function id()
    {
        return $this->_id;
    }

    /**
     * @param none
     * @return Graph_Node
     */
    public function getNodeTo()
    {
        return $this->_nodeTo;
    }

    /**
     * @param none
     * @return Graph_Node
     */
    public function getNodeFrom()
    {
        return $this->_nodeFrom;
    }

    /**
     * @param none
     * @return Graph_Directed
     */
    public function getGraph()
    {
        return $this->_graph;
    }

} |
/**
* A directed edge in a directed graph.
*/
class Graph_Edge
{
/**
* @var int Unique across the graph
*/
protected $_id;
/**
* @var Graph_Node $_nodeFrom
*/
protected $_nodeFrom;
/**
* @var Graph_Node $_nodeTo
*/
protected $_nodeTo;
/**
* @var Graph_Directed
*/
protected $_graph;
/**
* @param Graph_Directed $graph
* @param Graph_Node $nodeFrom
* @param Graph_Node $nodeTo
*/
public function __construct(Graph_Directed $graph,
Graph_Node $nodeFrom, Graph_Node $nodeTo)
{
$this->_id = $graph->getNextEdgeId($this);
$this->_graph = $graph;
$this->_nodeFrom = $nodeFrom;
$nodeFrom->outgoingEdges[] = $this;
$this->_nodeTo = $nodeTo;
}
/**
* @param none
* @return int
*/
public function id()
{
return $this->_id;
}
/**
* @param none
* @return Graph_Node
*/
public function getNodeTo()
{
return $this->_nodeTo;
}
/**
* @param none
* @return Graph_Node
*/
public function getNodeFrom()
{
return $this->_nodeFrom;
}
/**
* @param none
* @return Graph_Directed
*/
public function getGraph()
{
return $this->_graph;
}
}
Feel free to ask questions or give feedback via Twitter.
Posted: January 1st, 2012 | Author: Alex Korn | Filed under: Uncategorized | Tags: PHP | No Comments »
On Facebook today, I noticed one of my friends posted a picture with the label “1/365”. Like other people, she’s attempting to post one picture every day of the year. An admirable goal!
This got me thinking: I wonder how long it takes most people to give up on resolutions? Well, the best (read: easiest and cheapest) way to figure this out is to see how many Google results there are for “1/365”, “2/365”, etc.
This is how quickly we give up on our resolutions*:

It appears most people give up after the first week, and the vast majority give up after the first month or two. But if they stick with it for the first 10 months or so, they’re talking about it a lot until the end of the year.
The technical details
First off, Google’s estimates of how many results a query has are grossly exaggerated (thanks, James). The chart above uses Andrew Zich’s Google Search Matrix.
I had to remove some outliers, which I set to be the average of up to 3 days on either side of them.
- “7/365”: 719k (mostly in the form of “24/7/365”)
- “364/365”: 1.8m (apparently a lot of sites just have numbers in sequence)
Below is the PHP script I used to generate the numbers initially. Note that the Google homepage (and thus the text around the number of results) looks different when you aren’t logged in.
echo '<html><table>';

$matches;
for ($i = 1; $i <= 365; ++$i)
{
    $url = 'http://www.google.com/search?q=' . urlencode('"' . $i . '/365"');
    $result = file_get_contents($url);

    preg_match('/of about <b>(.*)<\/b> for/', $result, $matches);

    echo '<tr><td>' . $i . '</td><td>' . str_replace(',', '', $matches[1]) . '</td></tr>';
}
echo '</table></html>'; |
echo '<html><table>';
$matches;
for ($i = 1; $i <= 365; ++$i)
{
$url = 'http://www.google.com/search?q=' . urlencode('"' . $i . '/365"');
$result = file_get_contents($url);
preg_match('/of about <b>(.*)<\/b> for/', $result, $matches);
echo '<tr><td>' . $i . '</td><td>' . str_replace(',', '', $matches[1]) . '</td></tr>';
}
echo '</table></html>';
Here is the chart created with the numbers that Google estimates on the first page of results:

The general shape of the data is the same, but the actual numbers of results are very different between the two.
The disclaimer
Oh man, this is so unscientific it almost hurts. Just because someone stops posting about their resolutions doesn’t mean they’ve given up. Not everyone who’s come up with a resolution posts about it online. Etc etc etc. I sacrificed a lot of scientific rigor to come up with a catchy title.
Posted: April 28th, 2011 | Author: Alex Korn | Filed under: AWS, Hosting, Tutorials | Tags: PHP | 2 Comments »
Update 2013/06/27: I’ve updated some of the code to match new SES interfaces.
For those who have sent emails in PHP, the following code should look quite familiar:
mail($to, $subject, $message); |
mail($to, $subject, $message);
Unfortunately, this will silently fail on Amazon Web Services. But you do need to send those emails, right? Well, it’s pretty easy to get emails sent from AWS with Amazon Simple Email Service (Amazon SES). However, in my research on this, I found several false leads and no good tutorials, so here goes: step by step, how to send emails with AWS.
First step: sign up.
AWS SDK for PHP
Next, install the source code code for AWS SDK for PHP. Run the following in the directory where you store external libraries (using sudo when needed):
yum install git
git clone git://github.com/amazonwebservices/aws-sdk-for-php.git AWSSDKforPHP
Now that you have the the AWS SDK on your server, include AWSSDKforPHP/sdk.class.php into your application. You now have access to the AmazonSES class.
The following is a basic function to emulate PHP’s mail().
function amazonSesEmail($to, $subject, $message)
{
    $amazonSes = new AmazonSES(array(
        'key' => AWS_KEY,
        'secret' => AWS_SECRET_KEY
    ));

    $response = $amazonSes->send_email(AWS_SES_FROM_EMAIL,
        array('ToAddresses' => array($to)),
        array(
            'Subject.Data' => $subject,
            'Body.Text.Data' => $message,
        )
    );
    if (!$response->isOK())
    {
        // handle error
    }
} |
function amazonSesEmail($to, $subject, $message)
{
$amazonSes = new AmazonSES(array(
'key' => AWS_KEY,
'secret' => AWS_SECRET_KEY
));
$response = $amazonSes->send_email(AWS_SES_FROM_EMAIL,
array('ToAddresses' => array($to)),
array(
'Subject.Data' => $subject,
'Body.Text.Data' => $message,
)
);
if (!$response->isOK())
{
// handle error
}
}
Note that you need to define the AWS_KEY and AWS_SECRET_KEY for your application. You can find these by going to your AWS Security Credentials page and looking under “Access Keys”.
Validating the sending email address
Next, define AWS_SES_FROM_EMAIL to be the email address from which you want to send emails, e.g. no-reply@example.com. If you try to send an email at this point, you’ll get a MessageRejected error with the message “Email address is not verified.” Several pages I visited recommended I download the Amazon SES Scripts (Perl), but don’t do it! You’ll need to subject yourself to a world of pain in the form of installing Perl modules* (and probably Perl too, given that you’re reading a post on PHP!).
Instead, you can actually use AmazonSES to verify email addresses in PHP.
$amazonSes = new AmazonSES(array(
    'key' => AWS_KEY,
    'secret' => AWS_SECRET_KEY
));
$amazonSes->verify_email_address($fromEmailAddress); |
$amazonSes = new AmazonSES(array(
'key' => AWS_KEY,
'secret' => AWS_SECRET_KEY
));
$amazonSes->verify_email_address($fromEmailAddress);
Much easier than the Perl script shenanigans. This will send an email to your sending email address with a link to verify that you own that email address. Do the same for your recipient addresses (since you’re in sandbox mode, which has restrictions including the requirement to validate your recipient address). Verify each address and you should be good to go to send emails.
Setting up production access
At this point you’ll be able to send a couple test emails, but the volume is fairly limited. Request production access and you should be granted the ability to send many more emails and not need to verify recipient email addresses.
Reference
Visit the AWS SDK for PHP reference page for much more information on how AWS SDK for PHP works.
Amazon SES Scripts (Perl)
If you do want to install the Amazon SES Perl scripts and are getting an error along the lines of “Can’t locate XML/LibXML.pm in @INC…”, you can use yum to install all of the necessary packages to get them to run.
yum -y install perl-Digest-SHA perl-URI perl-libwww-perl perl-MIME-tools perl-Crypt-SSLeay perl-XML-LibXML
Thanks to this post for that hint.
(^ Back up)
Posted: March 25th, 2011 | Author: Alex Korn | Filed under: Tutorials | Tags: design patterns, PHP | No Comments »
The observer pattern is a handy design pattern often used in UI-focused languages like JavaScript, but not often used in PHP. Prior to PHP 5.3, the observer pattern was cumbersome to use and required a lot of objects – one for every possible observer. However, anonymous functions (Closures) in PHP 5.3 can replace the previously used Observer objects. This makes the observer pattern much more practical by reducing the number of classes that you need to make, often for one-time use.
Let’s write up our basic Observable object. You may want to make this class abstract since it’s probably not useful on its own.
class Observable
{
    /**
     * @var array Map<string eventName, List<Closure observer>> $_observers
     */
    protected $_observers = array();

    /**
     * @param string $eventName
     * @param array $data
     */
    protected final function _fireEvent($eventName, array $data = null)
    {
        if (isset($this->_observers[$eventName]))
        {
            foreach ($this->_observers[$eventName] as $observer)
            {
                $observer($data);
            }
        }
    }

    /**
     * @param string $eventName
     * @param Closure $observer With parameter (array $data)
     */
    public final function addObserver($eventName, Closure $observer)
    {
        if (!isset($this->_observers[$eventName]))
        {
            $this->_observers[$eventName] = array();
        }
        $this->_observers[$eventName][] = $observer;
    }

    /**
     * @param string $eventName
     * @param Closure $observer The observer to remove
     */
    public final function removeObserver($eventName, Closure $observer)
    {
        if (isset($this->_observers[$eventName]))
        {
            foreach ($this->_observers[$eventName] as $key => $existingObserver)
            {
                if ($existingObserver === $observer)
                {
                    unset($this->_observers[$eventName][$key]);
                }
            }
        }
    }

} |
class Observable
{
/**
* @var array Map<string eventName, List<Closure observer>> $_observers
*/
protected $_observers = array();
/**
* @param string $eventName
* @param array $data
*/
protected final function _fireEvent($eventName, array $data = null)
{
if (isset($this->_observers[$eventName]))
{
foreach ($this->_observers[$eventName] as $observer)
{
$observer($data);
}
}
}
/**
* @param string $eventName
* @param Closure $observer With parameter (array $data)
*/
public final function addObserver($eventName, Closure $observer)
{
if (!isset($this->_observers[$eventName]))
{
$this->_observers[$eventName] = array();
}
$this->_observers[$eventName][] = $observer;
}
/**
* @param string $eventName
* @param Closure $observer The observer to remove
*/
public final function removeObserver($eventName, Closure $observer)
{
if (isset($this->_observers[$eventName]))
{
foreach ($this->_observers[$eventName] as $key => $existingObserver)
{
if ($existingObserver === $observer)
{
unset($this->_observers[$eventName][$key]);
}
}
}
}
}
Now that we have the basic observable class, let’s look at a simple example:
class Person extends Observable
{
    protected $_name;
    protected $_friends = array();

    public function __construct($name)
    {
        $this->_name = $name;
    }

    public function getName()
    {
        return $this->_name;
    }

    public function getIntroducedTo(Person $person)
    {
        $this->_friends[] = $person;
        $this->_fireEvent('introduced', array('other' => $person, 'me' => $this));
    }

}

$sally = new Person('Sally');
$sally->addObserver('introduced', function(array $data)
    {
        echo 'Hi, ' . $data['other']->getName() . ', my name is ' .
            $data['me']->getName() . '.';
    });

$sally->getIntroducedTo(new Person('Harry')); |
class Person extends Observable
{
protected $_name;
protected $_friends = array();
public function __construct($name)
{
$this->_name = $name;
}
public function getName()
{
return $this->_name;
}
public function getIntroducedTo(Person $person)
{
$this->_friends[] = $person;
$this->_fireEvent('introduced', array('other' => $person, 'me' => $this));
}
}
$sally = new Person('Sally');
$sally->addObserver('introduced', function(array $data)
{
echo 'Hi, ' . $data['other']->getName() . ', my name is ' .
$data['me']->getName() . '.';
});
$sally->getIntroducedTo(new Person('Harry'));
The output will be "Hi, Harry, my name is Sally.". Note that you can easy modify the greeting Sally uses from outside that Person object without changing the functionality of adding the friend.
And there you have it – the observer pattern and an example, in less than 75 lines of code!
Posted: March 17th, 2011 | Author: Alex Korn | Filed under: AWS, Hosting, Tutorials | Tags: amazon, apache, ec2, linux, mysql, PHP | 29 Comments »
Do you know nothing about Amazon Web Services (AWS) or Linux server administration, but want to get a PHP/MySQL server set up on AWS? I was once like you, relying upon my web host to have PHP and MySQL installed and configured, so it was a bit daunting initially to work with AWS, but it’s actually rather simple. Read on and I’ll show you how to set up PHP and MySQL on one of Amazon’s free servers step by step. You can have a functioning site up and running within half an hour.
Amazon Web Services
First things first: Amazon Web Services has a ton of different products, but the one you want is Amazon Elastic Compute Cloud (EC2). Go there, and click “Sign Up for Amazon EC2”.
Once you’ve gotten that set up, go to the AWS Management Console, and click on “Instances” in the Navigation panel. An Instance is just a virtual server – so let’s create one! Click “Launch Instance” under “My Instances”, and select “Basic 64-bit Amazon Linux AMI”. On the Instance Details phase, select “Micro” (which is Free tier eligible). Continue until you need to enter the “Name” – if you don’t know what else to call it, just use “Web/DB server”.
Next you create a Key Pair – this will be the credentials you’ll use to SSH into the box. The instructions here should be fairly straightforward. Next is the Security Group, which will be used to specify the firewall used for your instance. Feel free to use the default Group for now. Continue to the Review phase and launch it!
You should now be able to SSH into your instance using your .pem file with ssh -i [FILE NAME].pem ec2-user@ec2-[IP ADDRESS].compute-1.amazonaws.com. Alright, we’ve got a server up and running! However, you may notice that this server has very little installed on it. which php? Nothing. which mysql? The same. Let’s install some software.
Configuring the Linux Server
Below I’ll show you how to set up PHP and MySQL on the server. I’ve separated PHP and MySQL so that it’s easier to adapt this to having two instances.
PHP
First, the basics for PHP:
sudo yum install php-mysql php php-xml php-mcrypt php-mbstring php-cli mysql httpd
Press ‘y’ for each of the prompts that shows up. Note that you’re logged in as ec2-user, so you need to sudo all of these commands.
You should now be able to create and run a PHP test file. Next, let’s get MySQL up and running.
MySQL server
First, install and begin running the server:
sudo yum install mysql-server
sudo /etc/init.d/mysqld start
Next, set the root password. I’ve found this password generator to be just dandy.
mysqladmin -u root password '[PASSWORD]'
Now we set up two users for MySQL: the administrator, which you’ll use to create and modify tables; and the app user, which the app will use to query the DB (with more limited privileges). Log into MySQL as root (mysql -u root -p) and enter each of the following lines:
CREATE DATABASE [DB NAME];
CREATE USER '[DB NAME]_admin'@'localhost' IDENTIFIED BY '[ADMIN PASSWORD]';
GRANT SELECT, INSERT, UPDATE, DELETE, CREATE, DROP, ALTER ON [DB NAME].* TO '[DB NAME]_admin'@'localhost';
CREATE USER '[DB NAME]_user'@'localhost' IDENTIFIED BY '[USER PASSWORD]';
GRANT SELECT, INSERT, UPDATE, DELETE ON [DB NAME].* TO '[DB NAME]_user'@'localhost';
You may want to fine-tune your database settings further than this, but this is a good start.
Make it web-accessible
We now have PHP and MySQL running on the box, but cannot access it through a browser. We need to configure the web server and set up an Elastic IP.
Web Server
First, let’s create a test PHP file that will be accessed by the browser. Create directories so that you can put your file in /opt/app/current1. Make an index.php file that contains whatever you want.
If you want to FTP transfer files to your server, you’ll want to give the ec2-user permissions to modify files in your web directory:
sudo chown ec2-user /opt/app/current
To set up the web server, httpd, we need to first modify its configuration file, located at /etc/httpd/conf/httpd.conf. Open it up with vim, emacs, or your favorite text editor, and go to the bottom of the file. Here you’ll see a small section on the VirtualHost (between <VirtualHost *:80> and </VirtualHost>). Uncomment it out and set DocumentRoot to /opt/app/current. Restart (or start) httpd:
sudo /etc/init.d/httpd restart
Elastic IP and Security Groups
In the AWS Management Console, click on “Elastic IPs”, then “Allocate New Address” under “Addresses”. Once the address is created, click on it, then “Associate Address”. Select the instance and associate it.
Now click on “Security Groups” in the Navigation panel. Select the Security Group that you used for the instance (probably the default one). Under the “Inbound” tab, add an HTTP rule (port 80). Click “Apply Rule Changes”, and you should now be able to access your website! In your browser, go to http://ec2-[IP ADDRESS].compute-1.amazonaws.com/, where the IP address is the Elastic IP you made with periods replaced with hyphens.
Hello World! or Putting it all together
We now have all the pieces we need to access MySQL from PHP and serve that to the browser-accessible website. So let’s log into mysql and create a sample table:
mysql -u [DB NAME]_admin -p
[type password]
mysql> use [DB NAME];
mysql> CREATE TABLE test (message VARCHAR(255));
mysql> INSERT INTO test (message) VALUES ('Hello world!');
Now modify your index.php file (/opt/app/current/index.php) to be the following:
<?php
$conn =  new mysqli('localhost', '[DB NAME]_user', '[USER PASSWORD]', '[DB NAME]');
$result = $conn->query("SELECT message FROM test;");
$row = $result->fetch_assoc();
echo $row['message'];
?> |
<?php
$conn = new mysqli('localhost', '[DB NAME]_user', '[USER PASSWORD]', '[DB NAME]');
$result = $conn->query("SELECT message FROM test;");
$row = $result->fetch_assoc();
echo $row['message'];
?>
We now have a fully functioning PHP and MySQL server!
Taking it further
That’s it for the basics, but there’s so much more that you can do now.
sudo pear upgrade
sudo yum install php-pear
sudo pear channel-discover pear.phpunit.de
sudo pear channel-discover pear.symfony-project.com
sudo pear channel-discover components.ez.no
sudo pear install phpunit/PHPUnit
I’ve found it handy to set up an administration area for my sites using a different port on the same URL. Note that port 80 is the default for web traffic, but 8080 is also commonly used.
Create /opt/app/admin. Then, in httpd.conf, add the line Listen 8080 after Listen 80 and add another VirtualHost entry, using <VirtualHost *:8080> and pointing to the /opt/app/admin directory. Update your Security Group to allow traffic over port 8080. Make sure to restart Apache and you should now be able to access your admin folder through your browser at yourdomain.com:8080.
You can then download phpMyAdmin into /opt/app/admin/pma and unzip it. Using the [DB NAME]_admin user, you can now manage your databases there through your browser.
Using two Instances
It can be very beneficial to performance to separate the web server and the DB server. To do this, you’ll need to set up two Instances, one of which has the web server httpd running and an Elastic IP, and the other of which has the MySQL server mysqld running.
They can use the same Security Group, but you’ll have to add the MySQL rule (port 3066) for Inbound traffic to allow the servers to talk to each other.
On the web box, instead of using “localhost” as the MySQL host, use the Internal IP address of the MySQL box. On the DB box, set up your grant permissions to allow from anywhere in '%.ec2.internal' (or just from your IPs).
Notes
-
/opt/app/current is a Rails convention that I enjoy. What you should do is put your releases in /opt/app/releases/[release #], then have /opt/app/current be a symlink to the current release.
Another (much more) common standard is to put web-accessible code in /var/www/html. Feel free to put your HTML code wherever you want; just make sure to update httpd.conf appropriately (and restart Apache).
^ Back up
Thanks to Ryan Ausanka-Crues at Palomino Labs for help with this.
Posted: May 19th, 2010 | Author: Alex Korn | Filed under: JavaScript | Tags: Google Chrome, Holmes, JavaScript, Mozilla Firefox, PHP | 1 Comment »
So you’ve been writing some JavaScript files (or HTML files or images) and testing them in Google Chrome or Mozilla Firefox. Unfortunately, you’ve deleted the JavaScript files, forgot to check them into the repository, didn’t make a backup, and they’re gone. Don’t fear! There is still hope!
Your missing file is stored in your browser’s cache, which can be accessed by typing about:cache into the URL box in Chrome or about:cache?device=disk in Firefox. This will list links to every file in your cache (and thus may take a moment to open). Individual files can be accessed by going to chrome://net-internals/view-cache/[[URL]] in Chrome or about:cache-entry?client=HTTP&sb=1&key=[[URL]] in Firefox.
The cached version will look like the following in Chrome:
[[URL]]
HTTP/1.1 200 OK
Date: Wed, 19 May 2010 15:17:36 GMT
Server: Apache
Last-Modified: Wed, 19 May 2010 15:13:53 GMT
ETag: "18aa1e6-1761-486f3e7ebae40"
Accept-Ranges: bytes
Content-Length: 5985
Content-Type: application/javascript
00000000: fb 00 00 00 01 00 00 00 34 62 bc 3d 8a e5 2d 00 ........4b.=..-.
00000010: ef 1a be 3d 8a e5 2d 00 e3 00 00 00 48 54 54 50 ...=..-.....HTTP
00000020: 2f 31 2e 31 20 32 30 30 20 4f 4b 00 44 61 74 65 /1.1 200 OK.Date
00000030: 3a 20 57 65 64 2c 20 31 39 20 4d 61 79 20 32 30 : Wed, 19 May 20
00000040: 31 30 20 31 35 3a 31 37 3a 33 36 20 47 4d 54 00 10 15:17:36 GMT.
00000050: 53 65 72 76 65 72 3a 20 41 70 61 63 68 65 00 4c Server: Apache.L
00000060: 61 73 74 2d 4d 6f 64 69 66 69 65 64 3a 20 57 65 ast-Modified: We
00000070: 64 2c 20 31 39 20 4d 61 79 20 32 30 31 30 20 31 d, 19 May 2010 1
00000080: 35 3a 31 33 3a 35 33 20 47 4d 54 00 45 54 61 67 5:13:53 GMT.ETag
00000090: 3a 20 22 31 38 61 61 31 65 36 2d 31 37 36 31 2d : "18aa1e6-1761-
000000a0: 34 38 36 66 33 65 37 65 62 61 65 34 30 22 00 41 486f3e7ebae40".A
000000b0: 63 63 65 70 74 2d 52 61 6e 67 65 73 3a 20 62 79 ccept-Ranges: by
000000c0: 74 65 73 00 43 6f 6e 74 65 6e 74 2d 4c 65 6e 67 tes.Content-Leng
000000d0: 74 68 3a 20 35 39 38 35 00 43 6f 6e 74 65 6e 74 th: 5985.Content
000000e0: 2d 54 79 70 65 3a 20 61 70 70 6c 69 63 61 74 69 -Type: applicati
000000f0: 6f 6e 2f 6a 61 76 61 73 63 72 69 70 74 00 00 on/javascript..
00000000: 2f 2a 2a 0a 20 2a 20 40 61 75 74 68 6f 72 20 41 /**. * @author A
00000010: 6c 65 78 20 4b 6f 72 6e 20 3c 61 6c 65 78 6b 6f lex Korn <alexko
...
The last section (in both browsers) displays the hexadecimal representation and the text of your file. The last column of this section displays newline characters as periods in many text editors, so we can’t use it to recover the file. We’ll have to use the hexadecimal. I wrote the following PHP script, which will extract and convert the hexadecimal representation into the text version:
<?php
$cacheString = ''; // COPY THE LAST SECTION IN HERE (Use /'/\\\'/g to escape quotation marks)

$matches = array();
preg_match_all('/\s[0-9a-f]{2}\s/', $cacheString, $matches);
foreach ($matches[0] as $match)
{
    echo chr(hexdec($match));
}
?>
Voilà! Your once-lost code is now found!
A couple notes:
- If your server has compression enabled (such as gzip), you’ll have to go through the extra step of unzipping the content
- Chrome version: 5.0.375.38 beta
- Firefox version: 3.6.3
Update 2011/05/14: I changed the \b’s in the RegEx to \s’s as recommended in this post on recovering gzipped files.